How to build your own portable 12v air pump
The small air pumps have become very popular. Many folks are simply gutting the Campbell Hausfeld pumps available at Wal-mart and other retailers and using them like that . Never to leave well-enough alone, I wanted to put mine in a case, a nice sturdy case. Here's how I did mine and it's not that expensive. If you like a project like I do, then this will be a fun one for you. Total cost-less than $40.
Parts list
- Aluminum box, Source Digikey.com, part number HM-154, (approx. 7.5" x 4.75" x 2"), cost $19.74
- Rocker switch, on-off-on, marked 0/1, black, source digikey.com, part number SW324-ND, cost $1.43
- 2 each, AMP, PIDG, Fast-on connectors (or suitable substitute), .205 tab, source digikey.com, part number A09047-ND, cost $2.30 for pack of 10. The AMP PIDG line of crimp connectors are superior to any other connector of this type. Try their butt splices, ring connectors and so on. Once you've tried them, you won't settle for any other brand. They're a double crimp style, made of superior materials.
- Campbell Hausfeld portable 12vdc air pump, model Model RP120000RB,
, source Walmart, and other fine retailers, cost varies from $4.49 at Campbell Hausfeld to about $14 at Wal-mart.
- 2 each, 2" x 10-32 flat head machine screws, Visit www.boltdepot.com for great selection and pricing.
- 8 each 10-32 nuts, regular old nuts.
- 2 each 10-32 nylon lock nuts, or use some more regular old nuts and double them.
- 4 each 10-32 washer
- 4 grommets that will fit snuggly onto the 10-32 bolts
- 1 each 3/8" I.D. grommet
- 1 each 3/16" or 1/4" I.D. (can't remember which it was) grommet
Tools needed
- drill, screwdriver, countersink (for making the flat head screws flush with surface of box), small triangle file, small wrenches for the nuts, and whatever else I forgot to mention. Oh, and a solder iron.
Here we go.
- Take the pump out of the OEM case. Pull the cooling fan off.
- The air hose doesn't get removed, leave it alone.
- Position the air pump into the box and decide where you want the mounting holes. Mark them.
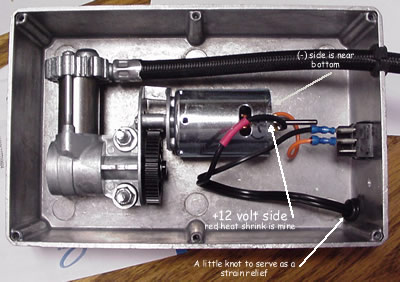
- Drill the hole for the wire, cut or de-solder the wires off the pump. Insert the grommet for the wire and feed the wire through. Put a simple knot in it for a strain relief. Figure out which terminal on the pump is the +12 volt side. Mine is shown here, yours may be different.
Don't get it backwards or
you'll un-air your tire. Not a ™Good Thing.
Don't worry that my connectors are blue. The red ones you bought from Digikey are better suited to this job. I didn't have any red ones, so I made the blue ones work.
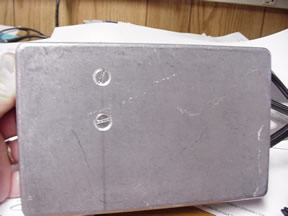
- Drill the holes and countersink to make the heads of the screws flush with the surface.
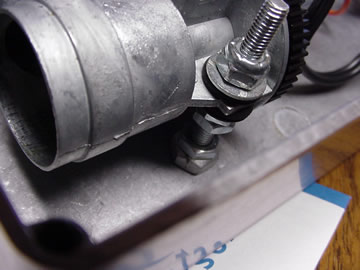
- Mount the pump. I'm not going to take mine apart to show you a lot of detail, but here 're the basics. These are listed in order from the bottom up. I double nutted the screw into place, put double nuts up higher to get the pump up high enough so the gears didn't hit the case, put a washer on those double nuts, a rubber grommet for vibration insulation, the pump, another grommet, washer, nylon lock nuts. Tightened the nylon nuts enough to compress the grommets, and hold the pump.
- Drill a hole for the power cord and drill a small hole so air has a way of
getting in. Drill a hole near the top for the air hose. The top of the hole will be open so that you can slide the grommet and hose into position. This hole near the edge is tricky. You'll likely have to drill a starter hold and then finish up by filing the rest of the material away. Drill bits don't like edges of metal.
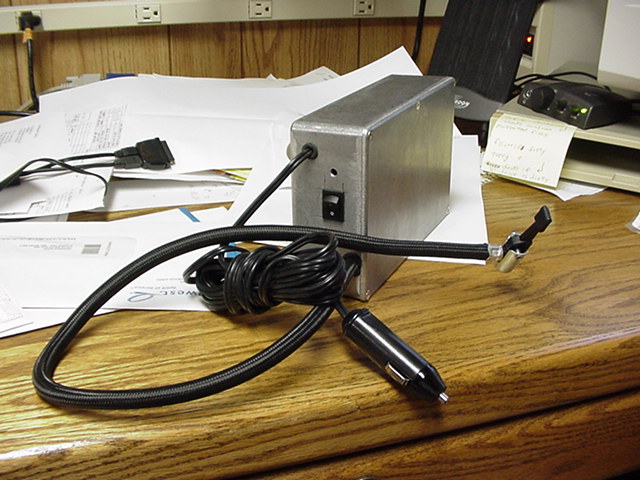
You'll have to cut a square hole for the switch, that is if you want a switch. I did, so I put one in. Get a square drill bit and have at it. Just kidding. I drew an outline of the hole needed and drilled a series of holes around the perimeter. I eventually got a hole big enough for my file and removed enough material to install the switch. If you have a Dremel, this will be a cake walk. Here's what the engineering sheet says you'll need for a hole.
I used the blue 14-16 gauge connectors. These were a little big for the wires used in this pump. I specified the 18-22 gauge connectors above, which will be red and adequate for the current draw of the motor. Mount the switch, crimp the connectors onto the wires and fasten the connectors to the switch. The (+) side from the cigarette lighter connector goes directly to the (+) side of the motor. The (-) side goes to the switch terminal nearest the 0 marked on the switch. The center terminal goes to the (-) side of the motor. Solder the wires to the pump according to the correct polarity. You may want something other than a cigarette lighter connector to supply the 12 volts. Use whatever you want. Test to make sure it works.
If you use this pump often, it would be a good idea to lubricate it on occasion. I wouldn't worry about lubing the gears, just the crank, rod and get some light grease or oil into the piston.
Test results:
Starting at 0 psi, the pump inflated a rear Sabre V-65 tire to 40 psi in under 7 minutes. Temperature of the head (IR thermometer) was 143° F. Too hot to touch, but I don't think beyond its design. I wouldn't want to inflate several tires at once, "Who left the spike strip out like that?"
As long as you're doing only an occasional bike tire, the lack of venting won't be a problem.
Hopefully that does it. Let me know if I got anything wrong in the instructions. Comments welcome.
Thanks.